
Baby Wrap Instructions
Babywearing has been both a joy and a lifesaver for us. I’m going to teach you my baby wrap instructions including how to tie a baby wrap, front-facing carry, hug hold, how to take a baby out and so much more. I talk about safety, answer common questions and I’ll also teach you about my favorite wraps and why.
Related: 13 Learning Lessons as a First Time Mom
Related: Meal Planning Tips for Busy moms

This post contains affiliate links, which means I make a small commission at no extra cost to you. See my full disclosure here.
- baby wrap instructions video (using boba wrap)
- how to Tie a baby wrap instructions (boba and moby)
- baby wrap front facing carry instructions
- boba and moby wrap hug hold instructions
- safely taking baby out of wrap instructions
- is the moby wrap safe for newborns?
- how to safely wear a baby in a baby wrap
- whats better – boba or moby wraps
- babywearing tips
- what is the easiest baby wrap to use
- how should baby's legs be in a carrier
- shop this post
- busy mom whole house cleaning schedule
- healthfully rooted home posts
- Pin it for later – Baby wrap Instructions
- About Me
baby wrap instructions video (using boba wrap)
how to Tie a baby wrap instructions (boba and moby)
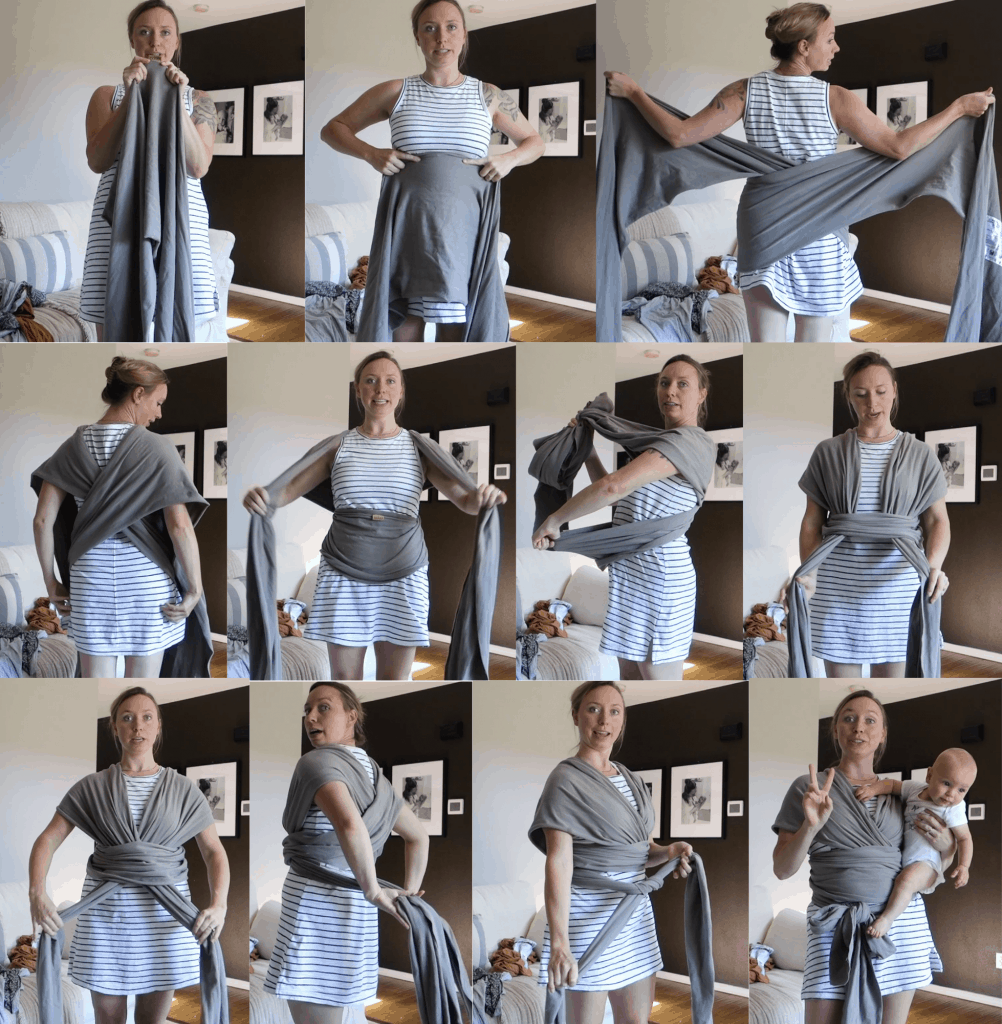
How to tie a baby wrap
- Find the center of the wrap
Whether you’re using Boba, Moby or Solly wraps the center of the wrap has a tag to identify that it’s the center.
- Place the center of wrap right below the breast line
Place the center of the wrap below your breast line and smooth it across your belly.
- Wrap it around your back and then cross
Take the two ends of the wrap around your back and then cross the pieces over each other on your lower back.
- Bring the long pieces over your shoulders
Drape the long panels over your shoulders (the ones you crossed behind your back).
- Tighten/smooth the fabric panels
Take a moment to stretch the panels in front of you so they are tight (this will tighten the part that’s wrapped around your belly). You’ll also want to make sure it’s all smooth and no bunched-up fabric (especially on your back).
- Put fabric panels through the belly panel
Take the long, hanging panels and put them through your middle panel that’s against your belly.
- Tighten/smooth again
Make sure everything is tight and smooth again.
- Cross long panels in front of you
Take the long fabric panels (the ones that are beneath the middle panel) and cross them in front of you.
- Wrap long panels behind your back
Take the long panels of fabric (that you just crossed) and loop them behind your back. Then cross and wrap in front of you again.
- Tie long panels in front of you
Take the long panels that you just looped around your body and tie them at your waist. I like to tie them in a bow. You can do a double knot, bow, tie them at your side, behind you – whatever is comfy!
- Now you’re ready to put your baby in your wrap
Move on to either my hug hold instructions or my front facing carry instructions below so you can start babywearing!
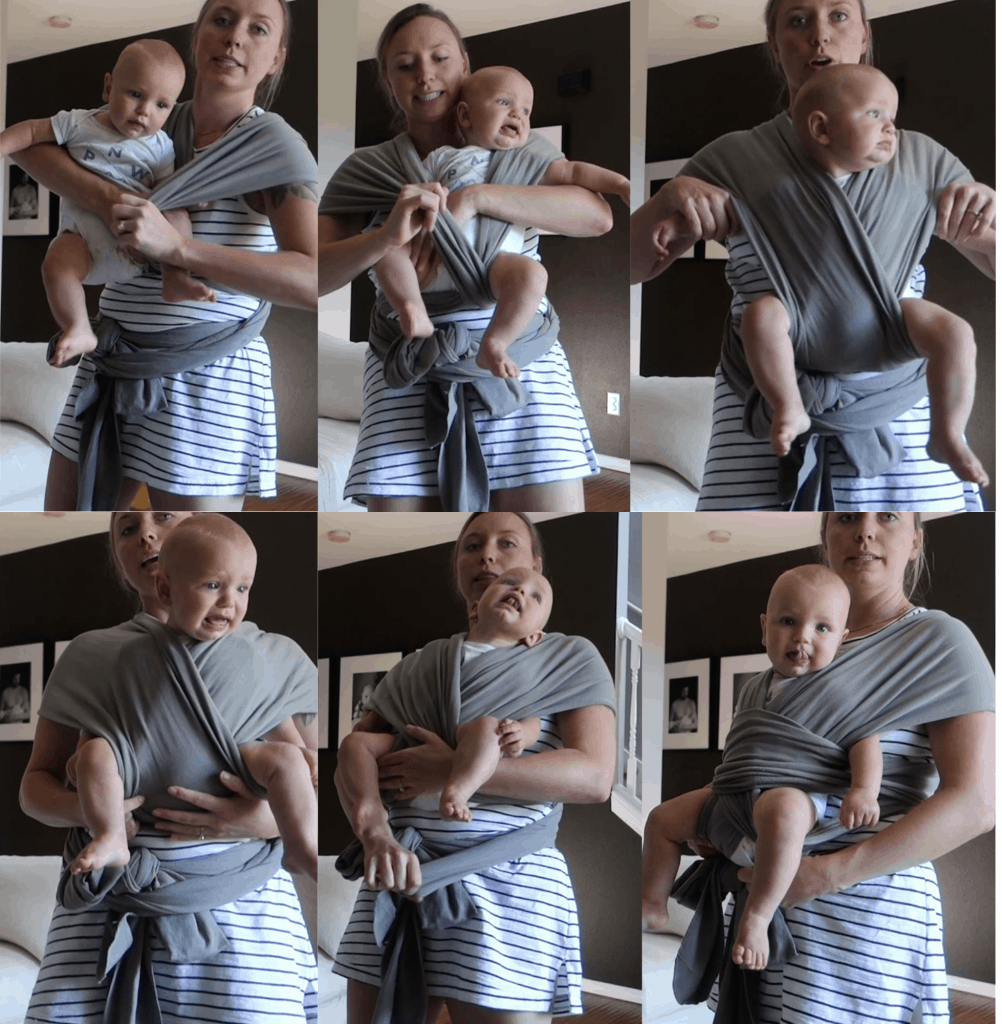
baby wrap front facing carry instructions
- Tie your baby wrap using above instructions – make sure it’s nice and tight with no bunched up fabric.
- Hold baby on your chest facing outward
- Lift the side panel closest to your body – Take the panel that is closest to your body (the one below the other side) and lift it up (try not to loosen).
- Stick baby’s leg and arm through that panel – while your baby is facing outward, stick their leg through that panel.
- Lift the other side panel – Now, lift the other panel (the one that was overtop the other side) – again, making sure not to loosen too much.
- Stick baby’s leg and arm through that side – Stick your baby’s other leg through that side.
- Smooth and adjust – Make sure baby’s arms are also sticking out of the panels. Then take the time to create a “seat” for your baby by smoothing the fabric panels over their bum.
- Give baby a pelvic tilt – Take your baby’s legs and lift them a bit so they have a pelvic tilt. Their legs and bum should make the letter “M” – knees should be higher than their bum.
- Put middle panel through baby’s legs and over belly – Lift the middle panel over the baby’s legs and smooth it overtop his belly.
- Secure and smooth – Make sure everything feels secure, your baby has his “seat”, a pelvic tilt, and there is no fabric bunched up anywhere.
- Bounce, hug and rock your baby – Sometimes babies will get a little fussy through this process. Just work through that by bouncing, shhing and rocking your baby back and forth and they should calm down within a few minutes. My baby would fuss up to 10 minutes and then relax.
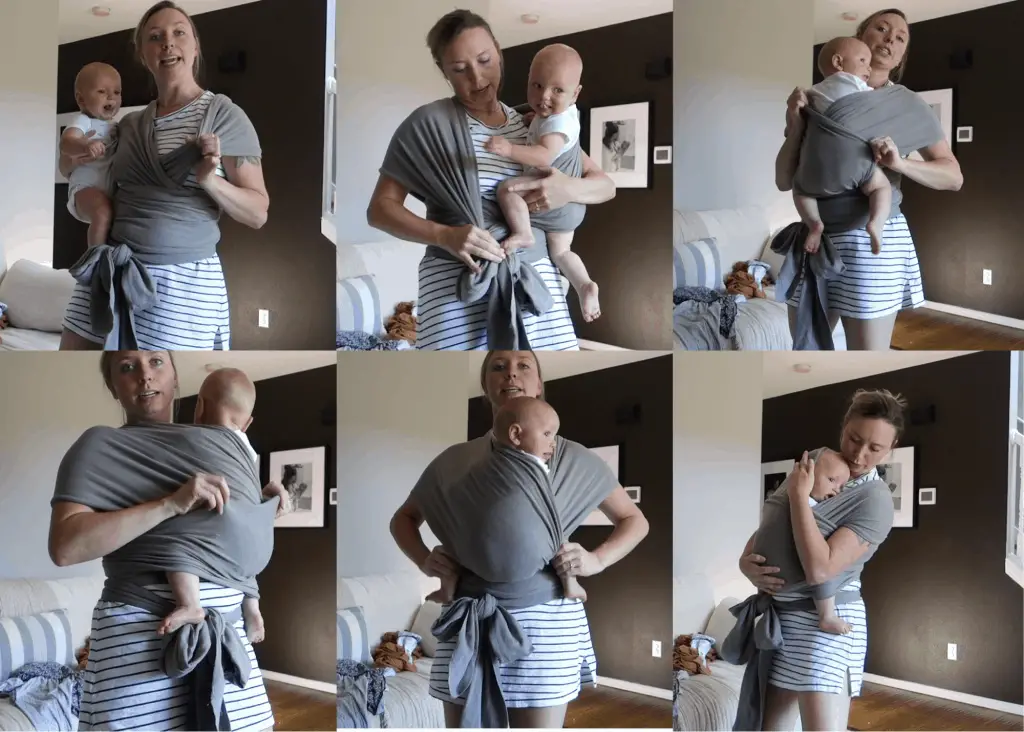
boba and moby wrap hug hold instructions
Make sure it’s nice and tight, with no bunched-up fabric.
Take the side panel that is beneath the other side panel and lift it slightly (try not to loosen too much).
Slip your baby’s leg through the side panel you have lifted and smooth that panel over their bum.
Take the other side panel (the one that was over top the other) and lift it slightly (making sure not to loosen too much).
Slip your baby’s leg through the other side panel and smooth the fabric over his bum and the fabric on the other side.
Now, take the middle panel which is at this point, pushed down, and lift it up and over your baby’s legs. Smooth it across their bum and back. Depending on how old they are you can use this panel as extra head support, or just let it rest below their neck. You can also cover their legs with this panel or not.
Take your baby’s legs and tilt them upward, giving your baby a pelvic tilt. His legs should be bent and wrapped around your belly. Their legs and bum should make the letter “M” – knees higher than bum.
Make sure everything is secure and all the fabric is smooth (not bunched up anywhere). You can also choose to take one of the side panels and put it over the side of your baby’s head (keeping face uncovered) as extra head support.
Sometimes babies will get a little fussy through this process, work through that stage by bouncing, shushing, rocking, and hugging your baby. They should relax within a few minutes.
safely taking baby out of wrap instructions
Take the middle panel (the one that overtops the other fabric panels) and slip it down and through your baby’s legs.
Take the fabric panel that is now on top and move it to the side so you can slip your baby’s arm out of that side.
Take the fabric panel (the only one that is on your baby at this point) and move it to the side and slip your baby’s arm out of that side.
Take both hands under either armpit and lift your baby up and out until their legs are completely out of the baby wrap.

is the moby wrap safe for newborns?
The Moby, Boba, and Solly wraps are all safe for newborns as long as they are put in the wrap correctly. See the instructions above for the “hug hold.” You should not use the front-facing carry for a newborn in a baby wrap because it doesn’t provide enough head support.
Related: cleaning schedule for busy moms
how to safely wear a baby in a baby wrap
To safely wear a baby in a baby wrap make sure you follow the following rules of babywearing:
- Keep their head close enough to kiss – this avoids any chance that they could get smothered by your clothing, the wrap itself, or your own body.
- Keep them upright – Make sure they are vertical with their head in a neutral position. Their chin should not be tilted down or up. Think of your baby’s airway like a straw: if you bend it too far down or up it’ll cut off the airway – but if you keep it neutral it has more breathing space.
- You can see their face – Make sure you can see their face; so no fabric is covering their face and they aren’t nuzzled into your chest.
- Keep the wrap tight – Make sure your wrap is tight so it hugs your baby close to your body. This helps with both you and baby’s comfort as well as making sure the baby wont slip out.
- 3 panels of support – Make sure you are using all 3 panels of support for their body. Both side panels and the middle panel are necessary to fully support the baby. If you have a baby under 6 months, make sure their head is also supported by fabric (but not covering their face).
- Maintain baby’s pelvic tilt – To prevent hip dysplasia, make sure your baby has a pelvic tilt while being worn. Think about the letter “M” when it comes to your baby’s leg positioning. Their legs knees should be higher than their bum.
- Don’t perform any dangerous tasks while babywearing – Make sure you aren’t using machinery that could get a piece of fabric stuck in it or potentially hurt your baby. Make sure you aren’t doing a lot of bouncing or running (especially if your baby is younger than 6 months).
Related: autumn homemaking – keeping your home healthy
whats better – boba or moby wraps
Benefits of boba wraps
- Thick fabric
- A little less expensive than Moby depending on the style
- Long fabric panels
- Very stretchy
Benefits of moby wraps
- Soft, lightweight fabirc
- Fun styles and patterns
- Not as much extra fabric
Personally, I prefer the Boba wrap because I like how stretchy it is. It makes the wrap really easy to manipulate and get exactly how tight I want it. I also like that it’s thicker fabric – this was great for my winter baby. One thing I do prefer about the Moby wrap, though, is the fact that it has less extra fabric that you have to tie around your waist.
babywearing tips

Put your wrap on before leaving the house
When you’re going somewhere and going to be babywearing, put your wrap on prior to leaving, then put your baby in once you get to where you’re going. This removes one step from the process when you’re in public.
Tie the baby wrap SUPER tight
At each step, pull the panels tight, then move to the next step. You can always loosen up the baby wrap but it’s much harder to tighten it once your baby is in the wrap.
Start wearing your baby early
From the moment they are born you can (and should) wear your baby to get them used to the wrap and to be close to you. That’s where they want to be anyway!
Push past the fussy period
I can tell you from someone who had a very colicky, refluxy baby – they might fuss in the beginning, but if you push past that, they will end up melting into you and loving the baby wrap. Give them 5-10 minutes to get used to being in the wrap, make sure they’re comfortable, and they’ll end up loving it and so will you.
what is the easiest baby wrap to use
Boba and Moby wraps are the easiest baby wraps to use in my opinion – the one caveat is you have to get through the learning curve of how to tie the baby wraps. Once you learn that, it’s so nice to have your baby’s weight evenly distributed across your back and not just on one side.
I do also use the 360 Ergo and both my husband and I love this when we are working in the yard or doing something outside.
how should baby’s legs be in a carrier
To prevent hip dysplasia, you’ll want to ensure your baby maintains a pelvic tilt. So you’ll have to adjust their legs so their knees are up and above their bum such as in the “M” position.
Related: clean living lifestyle tips
shop this post
- Moby wrap
- 360 Ergo
- Berkey water filter (we use the Royal because we drink an insane amount of water!)
- Primally Pure – Literally the most luxurious products you’ll ever use. Seriously.
busy mom whole house cleaning schedule
healthfully rooted home posts
Pin it for later – Baby wrap Instructions

About Me


Thank you! I was ready to switch to a front-facing position for when little one was alert and the moby/boba sites are only forthcoming with the front facing position.
Very happy to have your illustrated guide; I got to work around the house and narrate much more demonstrably!
You’re so welcome! Currently carrying baby #3 in the wrap right now. 🙂
Great tutorial! It’s nice to see how you illustrate step-by-step what you’re doing. Thanks for sharing.
Thank you for visiting. 🙂
This is a great tutorial. I like how you show pictures step by step. Thank you for sharing.
Thank you, Ada!
Lovely post. While I have a teen, I have a few friends that are new moms and scared to try the baby wrap. I’m
Gonna send them this post to show them how easy it is. Thanks for sharing.
Oh that’s perfect! Thank you for sharing
Instead of writing pages and pages it would be helpful if you could just give pointwose instructions step by step or a few pics of for demonstration
Thanks for coming here for this free content!