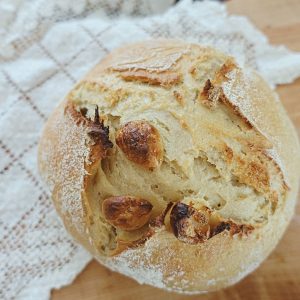
Roasted Garlic Sourdough Bread
Sourdough bread is healthier and more easier digestible than traditional bread because of the fermentation process. It's hard to believe this crunchy on the outside, soft on the inside garlicky bread is actually healthy - but it is!
Equipment
- Large bowl
- Water filter (or some way to get filtered water)
- Kitchen scale
- Proofing baskets or banneton baskets
- Dutch oven
- Razor, lame or knife
- Parchment paper
- Tea towel
- Dough scraper
Ingredients
- 700 grams All Purpose Einkorn flour you can use another kind of flour for this recipe, but you'll need to adjust the water content accordingly if so.
- 250 grams Bread flour you can omit this but make up for the grams with your other flour.
- 550 grams Warm water if you aren't using einkorn flour increase this to 650 g
- 200 grams Sourdough starter mature and active
- 20 grams Salt I use celtic sea salt for this recipe
- 100 grams Peeled garlic cloves
- Drizzle Olive oil
Instructions
Prepping Dough
- Feed your sourdough starter as your normally would - do this several hours before you want to start making your dough. Make sure it is active and has doubled prior to moving to the next step.
- Combine your flours and warm water in a very large bowl and let this rest for one hour. This is called autolyse and it hydrates the flour and starts the gluten formation process so you don't have to knead the dough.
- Add your sourdough starter and then mix with your hands to combine. No need to knead! Just make sure the ingredients are fully combined. Use a wet hand to limit sticking. Cover with a damp tea towel and rest for 15 minutes.
- Add your salt, mixing with wet hands just until incorporated. Let rest for 15 minutes.
- While this is resting, roast your garlic. Put peeled garlic on baking sheet with a drizzle of olive oil and roast at 400 degrees for about 15 minutes.
Stretch and Folds
- Add your roasted garlic right before you're about to perform the first stretch and fold.
- Perform about 4 stretch and folds. The first 2 should be spaced 15 min apart and the second two should be spaced about 30 minutes apart. You may need to do more depends on your dough. At each stretch and fold, gauge how the dough is doing and whether or not you should do another round. If your dough is very elastic and relaxed, do another. If it's tough and hard to pull, you're good. I find about 4 rounds is necessary.
- Using wet hands, grab the dough starting at the edge farthest from you and pull it up and fold it over itself (closest to your body).
- Rotate the bowl 180 degrees and do the same thing on this side.
- Rotate bowl 90 degrees and do the same thing.
- Rotate the bowl 180 degrees and stretch and fold again.
Bulk Fermentation
- After your stretch and folds, leave the damp towel over the bowl of dough and let it sit in a warm spot for many hours. The timing varies on your dough and environment. There will be a couple defining factors for when the dough has finished the bulk ferment: The dough will have doubled in size. There may be bubbles that have formed on the surface of the doughThe dough has relaxed and spread across the bowl (vs. looking bunched in a ball in the center of the bowl).
Shaping
- Use a dough scraper to carefully scrape the dough out of your bowl and onto a lightly floured surface.
- Use a dough scraper to cut the dough down the center (this recipe makes 2 loaves).
- Shape into 2 balls
- Let the dough rest for about 30 minutes.
- Turn the dough over, use floured hands if needed to shape. Bring one side of the dough towards the other (left to right) then do the same (right to left) then do top and bottom and bottom to top so all the corners meet in the middle.
- Shape the other ball of dough.
- Place shaped dough in your lightly floured banneton basket (seam side up), cover with plastic wrap and put in the fridge for 12-14 hours.
Bake Bread
- Preheat a dutch oven in the oven at 500 degrees for at least 30 minutes.
- Right before you want to bake, remove one basket of dough from the fridge.
- Flip the dough over onto lightly floured parchment paper (so now the bottom is the top)
- Lightly dust the top with flour.
- Use a razor to score your dough. Hold lame or razor at 30-degree angle to the dough surface and cut about 1/2 inch deep into the dough using swift, confident motions.
- Use two hands to lift your parchment paper that the dough rests on, and put it in your preheated dutch oven.
- Bake with the dutch oven lid on at 500 degrees for 20 minutes.
- Drop the heat to 475 degrees and bake with dutch oven lid off for 20 minutes (or until a nice brown crust has formed overtop).
- Remove from oven and let it rest for an hour (this is the worst part, I know!).
- Repeat with second loaf
Notes
- Grams vs. Cups - it's best to weigh the ingredients for sourdough bread. My recipe doesn't even suggest cups measurements because everyone's starter, flour and salt weight different amounts. So 1 cup of your starter could weigh something totally different than 1 cup of my starter. Sourdough bread is fickle and needs precise grams of each ingredient.
- Let your baked bread rest - I know you wont like me for this, but you really do need to let your bread rest for an hour after taking out of the oven. It continues cooking below that delicious looking crust.
- Scoring - there is a purpose to scoring! It directs the flow of what's called "rapid expansion" and without scoring, your bread could rapidly expand in areas where you don't want it to. Basically scoring is a control mechanism for where the bread will expand.
- Stretch and folds - you know those gorgeous holes in sourdough bread? This is what creates those! You definitely do not want to skip this step.